DIMM
This page documents a DIMM configuration workflow for RamRyder. To let software manage DIMM-backed memory at the memory-channel level, hardware interleaving needs to be disabled so that each channel can be reserved and exposed separately to the host.
Goal
The target setup is:
- disable hardware interleaving for DIMM-backed memory
- identify the physical address boundary of each memory channel
- reserve each channel as an independent memory region
- expose per-channel memory regions to software for later management
This setup is intended for systems where memory placement and allocation are managed by software rather than by the default hardware interleaving policy.
Inspect Hardware Topology
DIMM topology can be detected through either dmidecode or ipmctl.
- Check with
dmidecode:
sudo dmidecode -t 17
- Check with
ipmctl:
sudo ipmctl show -topology
 DimmID | MemoryType                  | Capacity    | PhysicalID| DeviceLocator
================================================================================
 N/A    | DDR5                        | 16.000 GiB  | 0x0025    | CPU1_DIMM_A1
 N/A    | DDR5                        | 16.000 GiB  | 0x0027    | CPU1_DIMM_B1
 N/A    | DDR5                        | 16.000 GiB  | 0x0029    | CPU1_DIMM_C1
 N/A    | DDR5                        | 16.000 GiB  | 0x002b    | CPU1_DIMM_D1
 N/A    | DDR5                        | 16.000 GiB  | 0x002d    | CPU1_DIMM_E1
 N/A    | DDR5                        | 16.000 GiB  | 0x002f    | CPU1_DIMM_F1
 N/A    | DDR5                        | 16.000 GiB  | 0x0031    | CPU1_DIMM_G1
 N/A    | DDR5                        | 16.000 GiB  | 0x0033    | CPU1_DIMM_H1
 N/A    | DDR5                        | 16.000 GiB  | 0x0035    | CPU1_DIMM_I1
 N/A    | DDR5                        | 16.000 GiB  | 0x0037    | CPU1_DIMM_J1
 N/A    | DDR5                        | 16.000 GiB  | 0x0039    | CPU1_DIMM_K1
 N/A    | DDR5                        | 16.000 GiB  | 0x003b    | CPU1_DIMM_L1
In this example, the server has a single socket (CPU1) with 12 memory
channels (A through L). In each channel, only one slot is populated with a
DDR5 DIMM.
Disable Hardware Interleaving
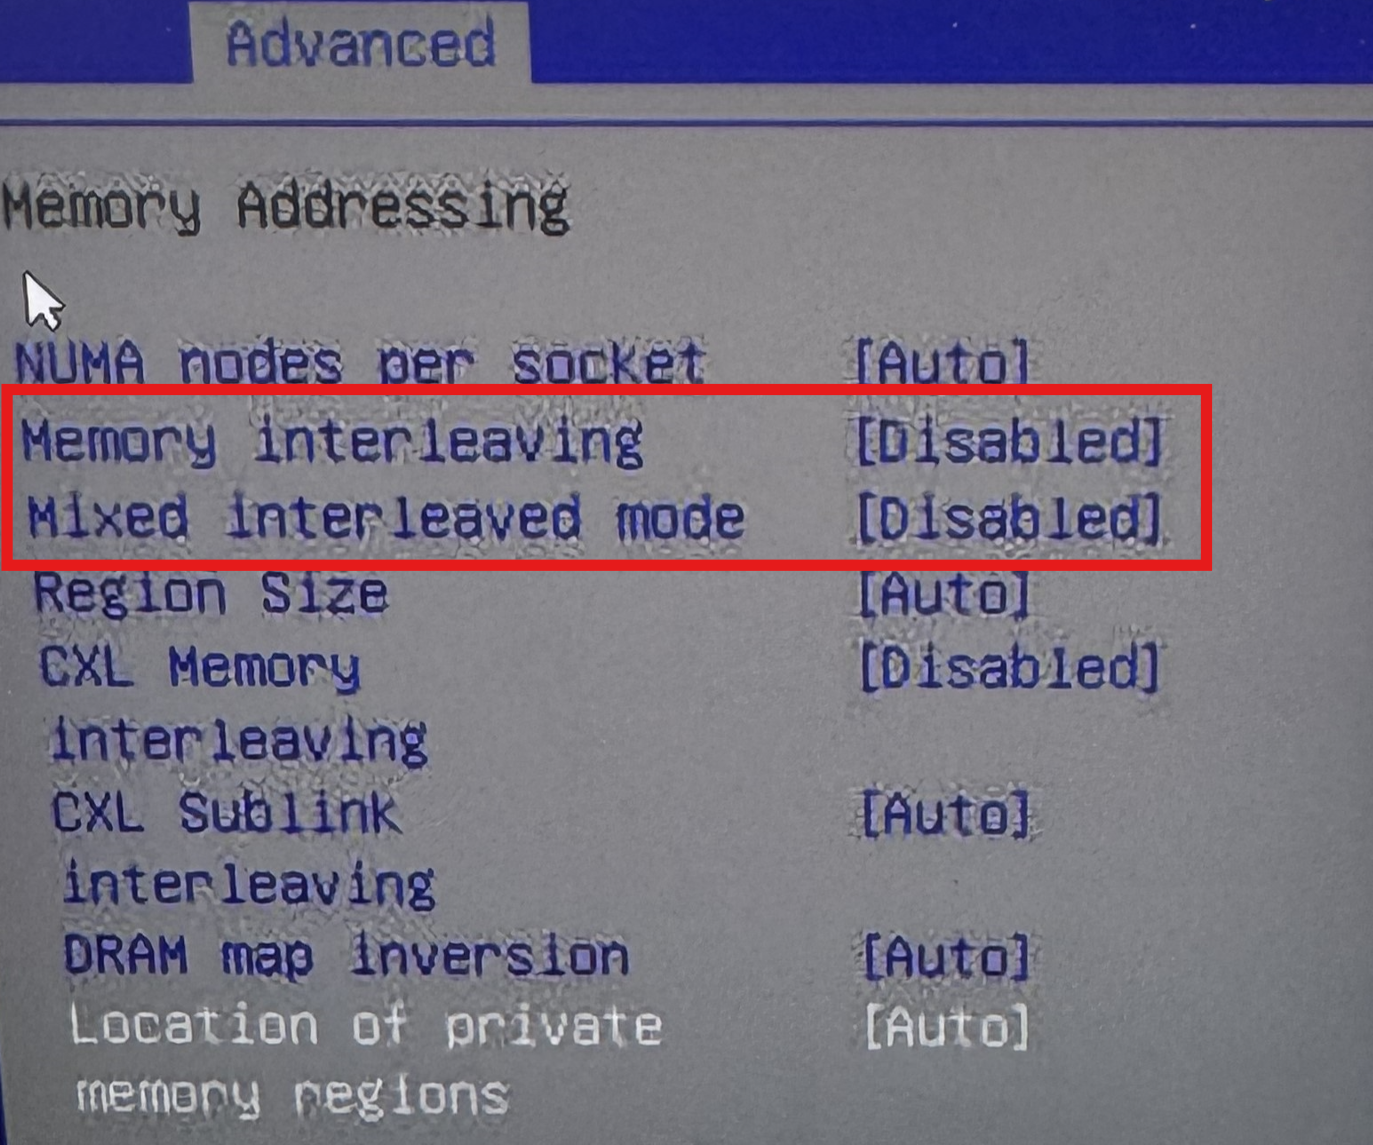
To disable hardware interleaving, configure the memory subsystem in BIOS/UEFI. The exact options vary across hardware platforms and depend on the processor and server vendor.
Below is one example from our server, where DIMM-related hardware interleaving
is disabled by turning off Memory Interleaving and
Mixed Interleaved Mode.
Reserve Memory Regions
1. Calculate channel boundaries
After disabling hardware interleaving, host physical memory is mapped to DIMM channels linearly. The next step is to identify the physical address range of each channel so that it can later be reserved and exposed separately.
The boundary of each channel can be estimated from the DIMM capacity populated
on that channel. In practice, the OS usually reserves several holes during
ACPI and NUMA initialization. These holes are reported by the kernel and can be
checked with dmesg. You need to account for these holes when calculating the
boundary of the first channel and the following address ranges.
We provide a tool to automatically detect and print channel boundaries. Please double-check the generated addresses manually, because hardware platforms and OS layouts may differ.
# in the RamRyder repository
./scripts/check_channel_boundary.sh <os_headroom_gb>
The os_headroom_gb parameter specifies how much memory to keep for the host
OS in the first DIMM. The script then suggests:
- a partial
memmapreservation for the first DIMM: reserve size = first DIMM size -os_headroom_gb - whole-DIMM
memmapreservations for the remaining channels
If os_headroom_gb is smaller than 5, the script prints a warning and
recommends keeping at least 5 GB for the OS.
Example:
bash scripts/check_channel_boundary.sh 5
Detected DRAM channels
  populated channels : 12
  total DRAM         : 192.00 GB
  hole               : 1.00 GB (0x40000000)
  boundary anchor    : 193.00 GB
  first DIMM for OS  : 5 GB

Channel    Locator                DIMM         Boundary     Start        End          Suggested Memmap
CPU1_A     CPU1_DIMM_A1           16.00G       17.00G       -            17.00G       memmap=11G!6G
CPU1_B     CPU1_DIMM_B1           16.00G       33.00G       17.00G       33.00G       memmap=16G!17G
CPU1_C     CPU1_DIMM_C1           16.00G       49.00G       33.00G       49.00G       memmap=16G!33G
CPU1_D     CPU1_DIMM_D1           16.00G       65.00G       49.00G       65.00G       memmap=16G!49G
CPU1_E     CPU1_DIMM_E1           16.00G       81.00G       65.00G       81.00G       memmap=16G!65G
CPU1_F     CPU1_DIMM_F1           16.00G       97.00G       81.00G       97.00G       memmap=16G!81G
...
2. Reserve memory regions from the kernel
Reserve memory with memmap based on the channel boundaries.
sudo vi /etc/default/grub
GRUB_CMDLINE_LINUX="memmap=11G!6G memmap=16G!17G memmap=16G!33G ..."
Update GRUB so the new kernel command line takes effect:
sudo update-grub2
Reboot the system after updating GRUB.
Configure Memory as DAX
After reboot, check the current regions and namespaces:
ndctl list -RNu
Then reconfigure the target namespaces as devdax devices:
sudo ndctl create-namespace -fe namespace0.0 --mode=devdax
sudo ndctl create-namespace -fe namespace1.0 --mode=devdax
...
Repeat the same pattern for the remaining namespaces on your system.
Final Verification
After configuration, verify that the expected per-channel DAX devices are exposed to the host:
ls /dev/dax*
Example output:
/dev/dax0.0 /dev/dax1.0 /dev/dax2.0 ...
Notes
- BIOS/UEFI option names may differ across server platforms
- channel boundary calculations should always be validated manually
- reserved memory ranges depend on both hardware layout and kernel memory holes
- namespace names may differ across systems